Showing posts with label polishing. Show all posts

Saturday, August 17, 2013

One-legged Polishing

My knee, injured on August 2nd, is bothersome but as I await surgery next week, I can do some polishing.  I pretty much have finished the top half of the Airstream and now can work, sitting in a chair, on the lower panels.  I take it 45 minutes at a time and rest a lot -- but it's good to see some continued progress.

I know I'll be disabled again after next Tuesday's arthroscopic procedure and lose a few weeks while I recover so I've been pecking away, keeping the weight and pressure off my bad leg.

It's still very slow going.  There is a lot of residual flecks of clearcoat that have to be removed, slowing the process a lot.  Some are really stubborn -- but I've learned to use solvent, even fine steel wool.  What I'm finding is that the lower sections are pretty dinged up -- lots of road rash -- but they polish up pretty well.  I have taken off the one protective panel on the front since the other is long gone on the roads outside Houston, and replacements are very pricey.

The squiggles are reflections in the morning sun -- it looks ok with just the first pass of polishing. 
I'll work on it a few hours more before surgery and then see how things go.  I can always head out this winter with work to do and polish the rest down south.  There are times where I question why I ever started this but all in all, it was a good move.  The injury has put a crimp in the schedule but the worst is over.

I have started to do some preliminary planning for our trip this year -- reviewing places we like and places we'll never visit again.  Now we have to get both of us tuned up and ready to travel.  We are keeping our doctors' cash flow flowing -- they'll likely all take great winter vacations.  Safe traveling.

Saturday, July 20, 2013

Slow Going

Between the weather, which has continued hot and humid with afternoon showers, and the persistent flecks and patches of clearcoat (which have to be removed with dabs of Strypeeze), the polishing is quite a project. As you can see, the top areas I have completed look pretty good. They will next get a pass with a finer polish which should remove most of the swirls and cloudy areas. Of course, I realized the other day that the two replaced panels in back did not have clearcoat, and seem to be a slightly different aluminum. They will polish up but not as shiny but who really cares?

You can see the contrast between the polished and unpolished areas here on the panel just above the buffer.

One thing this project has stimulated is my planning for this winter's trip. I'm reviewing the dozens of campground where we have stayed and lidting the good ones, with sites we like, and also have a "never again list by states.

We've had a cold front come through so polishing should be a bit more bearable. It's fun to chalk off one more section, but there's always more ahead. Fortunately, we are in no big hurry.


Monday, July 15, 2013

Let The Polishing Fun Begin

After over 30 hours of prep (But who's counting? I am.) I'm starting in on the polishing. I'm starting with F7 Nuvite, a rather coarse polish from Vintage Trailer Supply here in Montpelier. I'll run a finer polish later if and when I finish this set of sessions, which will likely be 20-25 hours. The weather, hot and muggy, is not conducive to long periods of work. So I sit down inside with iced coffee and write about it.
Here's how the front looked at the start - lots of oxidation from the peeled clearcoat.
Polishing involves smearing very small strips of polish on an area and using a slow-speed polisher to allow the particles in the F7 to strip off a minute layer of aluminum. You let the electric polisher do the work but it still takes a lot of energy to control it.
Building arm strength controlling polisher. It looks cooler out than it was - 80 degrees with high humidity.

It is a messy process - lots of small black bits of polish and I always wear a mask - even though it is tough in the heat. I decided to keep the initial session on the top front panel and will perhaps tackle another section this evening. If you are inclined to polish an Airstrteam or an airplane, Steve from VTS has a nice primer you can download here.

The polished area looks very bright, with swirl marks from the coarse polish. So far, so good.

Saturday, June 29, 2013

Meeting Mr. Filiform

I have decided to tackle the peeling clearcoat on the Airstream on a casual basis - a panel or two at a time. So today I continued to use up the Stypeeze on some lower panels. I found that the top half came off fast - I could hear the covering crinkling up as I applied stripper below. The lower half was much tougher- I wonder if they put two layers down nearer the road.

stripped clearcoat
The clearcoat comes off pretty well after 15-20 minutes using water and a rag (and protective gloves.)

As I have cleared off areas, I am noting areas of so-called filiform. Filiform corrosion on Airstream happens at the cut edges, rivet holes, scratches, and fittings from moisture and ocean or winter road salt begins at the unprotected aluminum at those areas and spreads under the clear coat finish, where it flourishes because it cannot dry out easily. Various owners handle it differently - some ignore it, some try to recover it with clear lacquer, others wax the heck out of it.

filiform on edge
Here is some filiform along a seam.
filiform along rivet holes
filiform forms around rivets as well.

In doing some online research, I found that a combination of wet sandpaper and then polishing is the way to go. I only had 400 grit sandpaper (I need 800, 1000 as well) so I tried a couple of test spots. Here's how it looks -- not sure it is better but it is nearly gone.

I purchased a gallon of stripper from Steve at Vintage Trailer Supply and will start using that next week. It promises to be easier on the user.

I read somewhere that it takes 200 hours to polish an Airstream the first time. I may do half this year and the rest next. So it might look a little strange - hey, get over it!


Thursday, June 17, 2010

Renovation Project About There

After pulling off the mouse fur, ripping up the carpet, removing the couch for recovering, cleaning off the glue from the walls, polishing the interior wall (for what seemed like ages, and cleaning up all the dirt and powder from polishing, I have spent the last week laying the new floor, installing the fittings for the curtains, installing the couch and side table, and hanging the curtains. The project is nearly done -- and looks pretty nice. Here's a shot of the couch area:
We hooked up a flat screen TV to replace the decade-old unit that came with the Airstream.


Now it's time to hook up and head out for a short stay up at Lake Carmi State Park this weekend.

Saturday, May 29, 2010

Renovation Going Slowly

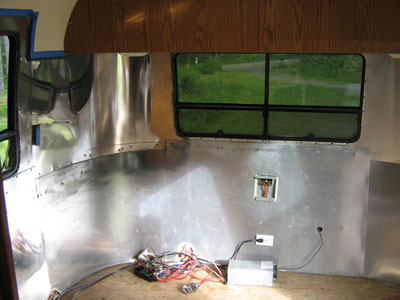
Having removed the carpet and much of the "mouse fur" from the walls in the dining/living area, I fried a few brain cells removing the glue backing with a solvent. Then, I began polishing the interior aluminum with mixed results. Have to get some more aggressive Nuvite polishing cream to work on the roughest areas but getting there slowly. Here's a progress photo.

I took a break from polishing and worked on tapping into the propane system and connecting up a catalytic heater to use when we are boondocking. My brother Barry had advised me on fittings and a general scheme and with patience and some "measure twice/cut once" technique, I got it installed on the front of the gas stove with a swinging door so that we can aim it rearward as well. Leak checks with soapy water and we're good to go.

The couch has been delivered to an upholsterer for recovering and should be ready by late June. Camping season is here -- time to get these projects buttoned up.